Navigating the art of tattooing has become easier with innovative tools and inventions.
One such breakthrough is learning how to use tattoo transfer paper without machine, a technique that allows tattoo artists to copy and transfer the design onto the skin with precision.
This method bypasses the need for a thermal copier, turning normal paper into a guide for a tattoo stencil.
By simply drawing the outline of the tattoo design on the transfer paper, artists can create a seamless copy that adheres to the skin, solving the problem of maintaining design integrity without high-tech equipment.
Also Read: How To Apply Tattoo Stencil Without Deodorant Like A Pro
What Are The Types Of Tattoo Transfer Paper?
Tattoo stencils can be created using either hectograph paper or thermal transfer paper, both utilizing a carbon ink sheet for transferring the design.
Despite operating on a similar principle, they function differently.
1. Hectograph Paper
Hectograph paper, also known as carbon paper, transfers the design from a carbon sheet onto the skin.
This transfer paper is often referred to as freehand transfer paper and does not require a hectograph machine to produce a copy.
Comprising 3 papers bound together: the top layer for drawing the tattoo design, a center tissue layer acting as a protective layer to prevent carbon from being accidentally imprinted, and the bottom layer, which is the transfer layer where carbon is transferred to the skin, making the transfer of the design possible.
2. Thermal Transfer Paper
Thermal transfer paper uses heat to transfer the carbon from a drawing onto the skin.
It adds an extra layer compared to hectograph paper, consisting of a yellow backing sheet that is protected, a white transfer paper that you run through the machine, a dark carbon paper that transfers the design, and a brown protective paper that stops the carbon from prematurely sticking to the skin.
How To Use Tattoo Transfer Paper Without Machine?
Discover ways to use tattoo transfer paper without a thermal copier, whether it’s hectograph or thermal transfer paper, to create a freehand tattoo design.
1. Getting The Transfer Paper Ready
Prepare by removing unnecessary layers from the hectograph paper; the middle layer is often a carbon paper that’s essential for the transfer.
For thermal paper, a brown onion paper may be used. Optionally, a backing paper helps to keep the lining of the tattoo design intact.
2. Drawing Your Design
A variety of choices exist to print or draw your design, from digitally created ones on ProCreate using an iPad or similar app, to spirit-inspired freehand designs on white paper.
This becomes a convenient master sheet to transfer over; if a mistake is made, experts advise starting afresh.
3. Tracing The Outline On The Carbon Paper
Once satisfied with your tattoo design, trace the outline onto the carbon layer of either thermal or hectograph transfer paper using a pen or pencil.
Press down carefully to ensure the original design transfers effectively onto the carbon layer.
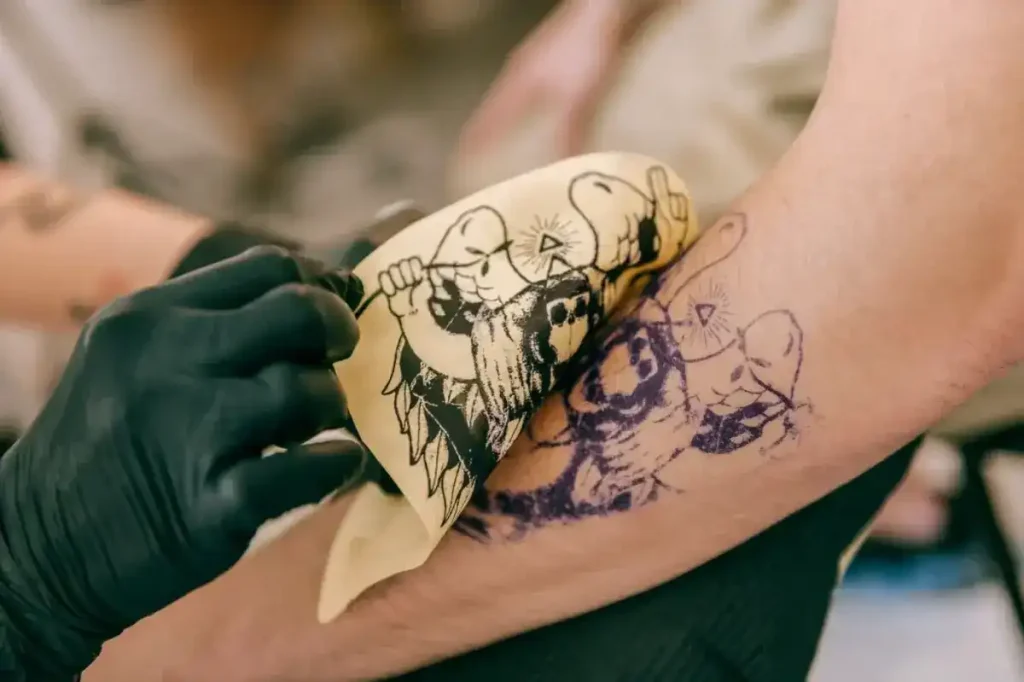
4. Peeling The Layers Away
After tracing your design, the moment of truth comes as you peel away the transfer paper to reveal the design.
Don’t touch the carbon paper directly; use your hand to gently lift and reveal the artwork on the transfer paper.
5. Cutting Out The Design
Cut around the design, leaving an inch of space from the outer line. This area makes it less difficult to transfer onto the skin.
Use scissors carefully to avoid touching or cutting into the design itself.
Also Read: How To Remove Tattoo Stencil At Home Like A Pro!
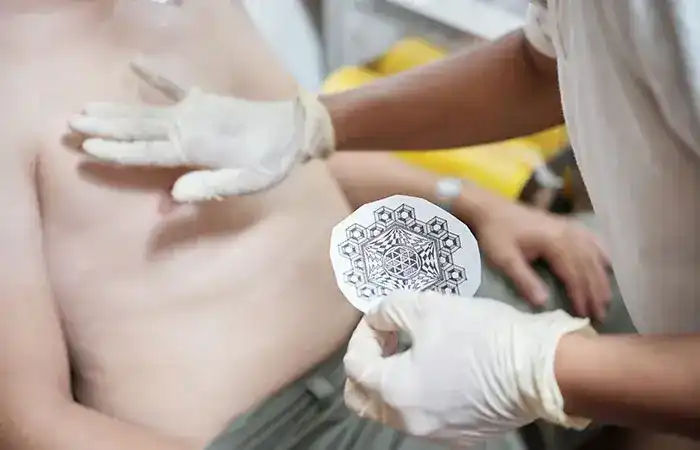
How To Use The Tattoo Stencil?
Tattoo stencil application is seamless from paper to skin with proper sanitation.
Ensure skin is ready using green soap, a one-time unused razor, and transfer solution for cleanliness.
1. Preparing The Skin
Preparing the skin involves washing with green soap and shaving the area to remove body hair for a clean surface.
Use an alcohol pad and hand sanitizer to eliminate oil and dirt.
2. Applying The Transfer Solution
When applying the transfer solution, gauge by eye until the skin feels tacky.
This consistency helps the cut-out transfer paper design to stick and work with the skin.
3. Placing The Tattoo Stencil On The Skin
Once satisfied with the transfer solution application, place the tattoo stencil on the skin in a neutral position.
Press down and hold for 30 seconds to 1 minute, then pat dry any excess ink after 15 minutes to ensure the ink transfers.
4. Peeling Off The Transfer Paper Tattoo Stencil
After waiting 10 to 15 minutes, peel off the transfer paper with the tattoo stencil against the grain of hair.
Carefully ensure the tattoo stencil is transferred onto the skin.
Also Read: Why Is My Tattoo Shiny
8 Ways On How To Use Tattoo Transfer Paper Without Machine
Tattoo transfer paper provides several ways to transfer designs onto skin without a tattoo machine.
These sheets, with plastic and adhesive coating on one side, are pivotal in the tattoo industry for creating patterns and ink work on a small sheet or book using alternative methods and technique.
1. Temporary Tattoo Art
Creating temporary tattoos with transfer paper allows for henna tattoos or other designs to be printed directly onto the plastic side of a sheet.
Cut into a sticker shape, apply a thin layer of glue on the skin, place the stencil, then cover with a piece of paper or plastic baggie.
Press down firmly, wait several minutes until the glue dries completely, then peel off to remove any pieces, leaving the design on the skin.
2. Waterproof Stencils
For waterproof stencils, use transfer paper to apply a temporary stencil on the skin.
After applying glue, place the tattoo transfer paper sticker, then cover and press as before.
Once dry, peel off and remove excess, ensuring the design remains on the skin.
3. Stencil For Airbrush
Using transfer paper for temporary stencils revolutionizes airbrush tattoos.
Simply print your desired pattern on the plastic side of a sheet, then cut it into a sticker shape.
Apply glue to the skin, place the tattoo transfer paper sticker over it, and cover with a piece of paper or plastic baggie.
Press down firmly, wait several minutes for the glue to dry completely, then peel off.
As you remove the backing, the pieces of your design remain on the skin, ready for the airbrush application.
4. Glitter Stencils
For glitter stencils using transfer paper, create temporary glitter tattoos that sparkle.
Instead of a permanent marker, apply glue to the skin and place the tattoo transfer paper sticker where you want your tattoo.
Cover the area with powdered glitter, then use a piece of paper or plastic baggie to press down firmly.
After waiting several minutes for the glue to dry completely, peel off the transfer and remove any excess pieces. Your design remains on the skin, now covered in glitter.
5. Temporary Tattoo Stencils
Transfer paper isn’t just for temporary tattoo stencils; it’s a game-changer for those who love ordinary tattoo transfer without the permanence.
First, apply a tattoo stencil onto the area with glue, then press down on one end using a pencil or pen.
Place the tattoo transfer paper sticker on top, wait several minutes for the glue to dry completely, then peel off to remove any pieces.
The design remains on the skin, serving as a guide for performing ink work.
6. Easily Changeable Striped Designs
For those who appreciate easily changeable, striped designs, transfer paper offers a unique approach.
By drawing vertical stripes with a ruler or printing them onto the skin using a marker or paint that does not wash away with water, but can come off with baby oil, you create dynamic, temporary tattoos.
This method allows for quick changes and experimentation with different patterns on the skin.
7. Tattoo Transfer Designs Onto Fabric
Transfer paper allows for temporary tattoos to be applied onto fabric, reminiscent of paper dolls.
First, cut a piece of fabric to the desired size and mix a small batch of cornstarch and baby powder in a bowl.
Apply this mixture with a brush onto the fabric, then place your temporary tattoo atop.
Cover with tissue paper, press down firmly with the end of a pencil or pen to create the tattoo.
8. Stencil For Nail Art
Utilizing transfer paper for temporary stencils elevates nail art to new heights.
Print your design or pattern on the plastic side of a sheet, then cut into a sticker shape.
Apply glue to fingernails or toenails, place the transfer paper sticker on top, and press down firmly.
After waiting several minutes for the glue to dry completely, peel off to remove any pieces, leaving your nails covered in the design.
Also Read: Tattoo Scab Fell Off Raw Skin Underneath Revealed
7 Things To Consider When Using Tattoo Transfer Paper Without Machine
- Quality of the paper is paramount. Avoid cheap, low-quality options as they won’t work well or last. Opt for high-quality transfer papers like Airflow or QuickPro to ensure durability and clarity in the transfer.
- Practice is essential to master the technique. Before attempting on skin, use practice sheets to get accustomed to the pressure and motion needed for a successful transfer.
- Measure and cut the tattoo transfer paper to match your design’s needs. Careful handling is crucial to avoid smudging the sticky side of the paper with your fingers.
- When placing the design face down on the skin, ensure it lines up perfectly. A hard time lining up the transfer could lead to inaccuracies in the final tattoo.
- Use a thin, hard, flat object like a ruler to outline the design on the skin. Steady hands are vital; start at one end and press lightly towards the other to avoid paper breaks.
- After pressing down the design, check for any bubbles. If found, gently remove them with a needle or soft cloth to ensure the design is carefully pressed onto the skin.
- Rub the back of the tattoo paper firmly yet carefully against the skin to secure the transfer. Too much pressure can cause the paper to rip apart, ruining the design.

5 Helpful Tips To Make Sure The Ink Does Not Smudge
Ensuring ink is transferred correctly and doesn’t smudge during tattooing is key. Here are five tips to keep the design sharp and clear on the skin:
- Use high-quality transfer paper to minimize the risk of ink smudging.
- Avoid touching the ink before it has dried; this helps prevent smudging.
- Apply a thin layer of Vaseline over the stencil ink to create a protective layer that makes it easier to wipe away any excess ink or blood without smudging.
- Clean the skin using distilled water and green soap before applying the tattoo to remove oils that can cause ink to smudge.
- Wait until the stencil ink has completely dried before starting the tattooing process to ensure it doesn’t rub off.
Also Read: Oops! I Accidentally Scratched My Tattoo In My Sleep – What To Do Now?
FAQs About How To Use Tattoo Transfer Paper Without Machine
1. Why Is A Thermal Copier Good For Tattoo Stencils?
A thermal copier excels at creating tattoo stencils with precise lines for transfer to skin, making the process quicker than manual tracing. The paper and carbon layer work together seamlessly in the machine.
2. Can You Use A Regular Pencil For Tattoo Transfer Paper?
Yes, a regular pencil can be used on hectograph or thermal transfer paper. The pressure you press down with transfers the design from the carbon paper to the other side effectively.
3. Can I Use Deodorant To Transfer The Tattoo Stencil To Skin?
Deodorant can facilitate the transfer of a tattoo stencil to skin, but caution is advised. Choose deodorants that don’t cause skin irritation or flaky skin to ensure an ideal surface for tattooing.
Final Thoughts
In summarizing “how to use tattoo transfer paper without machine”, it’s clear that while tattoo stencil machines and thermal copiers offer precision and ease, mastering the hands-on approach with tattoo transfer paper allows for relying less on machine technology.
Through practice and following the right steps, artists can apply stencils directly to the skin for tattooing without the need for machines.
This method not only preserves the art’s integrity but also connects the artist’s hands to their work, ensuring precision in every line over a long time.
Thus, mastering how to use tattoo transfer paper without machine becomes a valuable skill in the tattooing process.